
Using a roasting pan with rack can seem intimidating at first, but once you get the hang of it, you’ll wonder how you ever cooked without one. This kitchen tool is a must-have for anyone looking to make delicious meals easily. It’s a Delighted Technology that can transform your cooking routine, especially for chicken lovers.
Understanding the Basics of a Roasting Pan with Rack
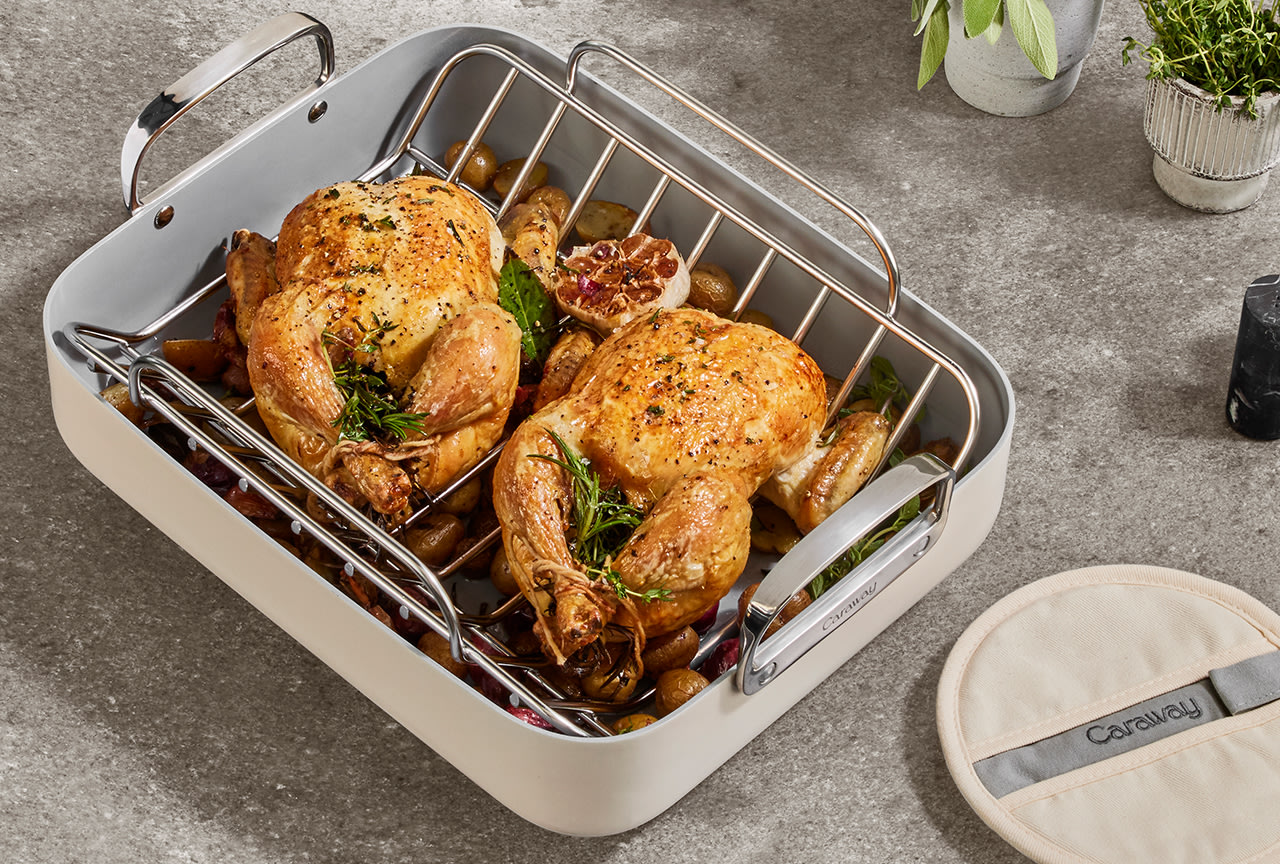
Before diving into the nitty-gritty details, let’s understand what a roasting pan with a rack is. This kitchen equipment consists of a large, deep pan accompanied by a removable rack. The pan catches drippings while the rack holds the food above these liquids, allowing for even cooking and improved flavor.
Why Use a Roasting Pan with Rack?
A roasting pan with rack offers numerous advantages. It allows for efficient heat distribution, ensures even roasting, and minimizes the risk of burning. Additionally, it makes food healthier by draining excess fats and juices.
Parts of a Roasting Pan
Understanding the different components of a roasting pan with rack can be essential for proper utilization. Here are the main parts:
- The Pan: Usually made of stainless steel or aluminum, offering durability and even heat distribution.
- The Rack: Elevates the food for better air circulation and even cooking.
- Handles: Make it easier to move the pan in and out of the oven.
Choosing the Right Roasting Pan with Rack
Before you start using your roasting pan with rack, you should ensure it’s the right fit for your needs. There are several factors to consider, such as size, material, and price range.
Size and Capacity
The size of the roasting pan you choose should depend on what you plan to cook. For a whole chicken, a medium-sized pan (about 14 inches) is ideal.
Material
Roasting pans come in various materials including stainless steel, aluminum, and enameled cast iron. Stainless steel is durable and offers even heating, making it an excellent choice for most cooking needs.
Price Range
Your budget will also play a role in your choice. While some high-end roasting pans can be quite expensive, there are reliable options available at more affordable prices.
Step-by-Step Guide to Using a Roasting Pan with Rack
Now that you understand the basics, let’s dive into how to use your roasting pan with rack effectively. Follow these steps to ensure delicious and evenly cooked meals every time.
Preheating the Oven
Start by preheating your oven to the desired temperature. Most recipes will call for a preheated oven to ensure even cooking.
Preparing the Pan and Rack
- Position the rack in the roasting pan.
- Lightly coat the pan with cooking spray or oil to prevent sticking.
Seasoning Your Chicken
Before placing your chicken on the rack, make sure to season it well. Use a mixture of salt, pepper, and your favorite herbs for the best results.
Placing the Chicken on the Rack
Position the chicken breast-side up on the rack. Make sure it’s centered and not leaning to one side for even cooking. If desired, tie the legs together to ensure the chicken maintains its shape.
Adding Vegetables
For an all-in-one meal, add vegetables to the bottom of the roasting pan. This will allow them to soak up the juices and flavors from the chicken, making for a delicious side dish.
Basting
Basting helps ensure that your chicken remains moist throughout the cooking process. Use a baster or spoon to pour pan juices over the chicken every 30 minutes.
Checking the Temperature
Use a meat thermometer to check the internal temperature of the chicken. It should reach at least 165F in the thickest part of the breast and thigh.
Resting the Chicken
After removing the chicken from the oven, let it rest for 10-15 minutes before carving. This allows the juices to redistribute, ensuring a moist and flavorful result.
Cleaning and Maintenance
Proper care of your roasting pan with rack will ensure it lasts for years to come.
Immediate Cleaning
Clean your pan and rack immediately after use to prevent food from sticking. Use warm soapy water and a non-abrasive sponge for the best results.
Removing Stubborn Stains
For stubborn stains, let the pan soak in warm soapy water for a few hours before scrubbing. Alternatively, baking soda and vinegar can be used as natural cleaning agents.
Common Mistakes to Avoid
To ensure your roasting pan with rack serves you well, avoid these common mistakes:
- Not preheating the oven.
- Overcrowding the pan.
- Skipping the basting process.
FAQs
What can I cook in a roasting pan with rack?
You can cook a variety of dishes including chicken, roasts, and vegetables.
Do I need to use oil on the rack?
Lightly oiling the rack can prevent sticking but it’s not strictly necessary.
How often should I baste my chicken?
Basting every 30 minutes ensures the chicken remains moist.
For More Tips
For more tips and recipes, visit our related articles: Cook Rotisserie, Reheat Rotisserie, and Rotisserie in Fridge.
As an Amazon Associate, I earn from qualifying purchases.
As an Amazon Associate, I earn from qualifying purchases.


