If you are someone who loves cooking chicken, you might have asked yourself, What side of the meat tenderizer do I use at least once. Knowing which side of the tenderizer to use can make a huge difference in the texture and taste of your dish.
The main purpose of a meat tenderizer is to break down the fibers in the meat, making it tender and easier to cook.

The Purpose of a Meat Tenderizer
Meat tenderizers are versatile kitchen tools designed specifically to break down tough meat fibers. This makes meat easier to chew and enhances its flavor by allowing marinades and spices to penetrate deeper.
Types of Meat Tenderizers
- Manual Meat Tenderizers
- Blade Tenderizers
- Pounders vs. Mallets
Manual Meat Tenderizers
Manual meat tenderizers are the most commonly used in households. These come with either a single or double-headed mallet. Both heads have different purposes and knowing which one to use is crucial.
Blade Tenderizers
Blade tenderizers have sharp blades that cut through the meat fibers, making them an excellent choice for tougher cuts of meat.
Pounders vs. Mallets
Pounders and mallets are often used for similar purposes. However, a mallet usually has two different heads – one flat and one textured.
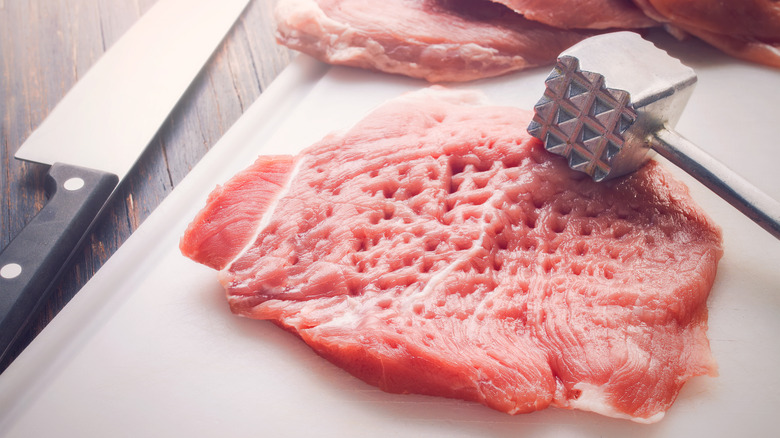
Understanding the Two Sides of the Meat Tenderizer
Flat Side
The flat side of the meat tenderizer is generally used for flattening out meat, which helps in even cooking.
Textured Side
The textured side of the meat tenderizer is used to break down tougher fibers in the meat, making it tender. This side is typically used for tougher cuts like steak or pork chops.
When to Use the Flat Side
The flat side is ideal for chicken breast, which needs to be cooked evenly. It helps achieve a uniform thickness, making your dish cook evenly.
For instance,Parmesan-crusted chicken requires a flat meat surface to ensure it cooks evenly. Check out cooking parmesan for detailed instructions.
When to Use the Textured Side
The textured side is ideal for breaking down the fibers of tougher meats. This allows seasonings to seep in, making your dish more flavorful.
For example, you might use the textured side when preparing to cook drumsticks. Learn more at cooking drumsticks.
Best Practices for Using a Meat Tenderizer
- Always use a cutting board to protect your countertops.
- Cover the meat with plastic wrap to prevent splattering.
- Apply even pressure to avoid tearing the meat.
Common Mistakes to Avoid
Over-tenderizing can make the meat mushy. Inconsistency in tenderizing leads to uneven cooking.
Cleaning and Maintenance
Regular cleaning of your meat tenderizer is essential. Most are dishwasher safe, but always check the manufacturers instructions.
Benefits of Properly Tenderized Meat
Properly tenderized meat not only tastes better but also cooks more evenly. It absorbs marinades better, making your dish more flavorful.
Additional Tips for Chicken Lovers
Chicken lovers can greatly benefit from using a meat tenderizer. Whether you are cooking chicken leg quarters in the air fryer, the right use of a tenderizer can make all the difference. Learn more about this at chicken legs.
Other Tools to Consider
Consider using dedicated chicken shears or a mallet with interchangeable heads designed for specific types of meat.
FAQ Section
- Q: What side of the meat tenderizer do I use? A: Use the flat side for even cooking and the textured side for breaking down tougher fibers.
- Q: How do I clean my meat tenderizer? A: Most meat tenderizers are dishwasher safe, but check the manufacturers instructions.
- Q: Can I use a meat tenderizer on chicken? A: Yes, using the proper side of a tenderizer can greatly enhance your chicken dishes.
Learn more about how to use a meat tenderizer.
As an Amazon Associate, I earn from qualifying purchases.