Are you a passionate chicken lover eager to provide the best start for your chicks? The key to raising healthy chicks is setting up a portable chick brooder setup that is both functional and safe. Whether you’re a seasoned poultry enthusiast or a first-time chick owner, understanding the essentials of a brooder setup will ensure your chicks thrive. Let’s dive into the details of creating a perfect portable chick brooder setup.

Why Choose a Portable Chick Brooder?
A portable chick brooder setup offers flexibility and convenience. It allows you to easily move your chicks to different locations, ensuring they receive the optimal environment they need. This adaptability is particularly beneficial if you’re managing space constraints or if you plan to move your chicks as they grow.
Essential Components of a Brooder Setup
Every successful portable chick brooder setup includes a few critical components:
1. Brooder Box
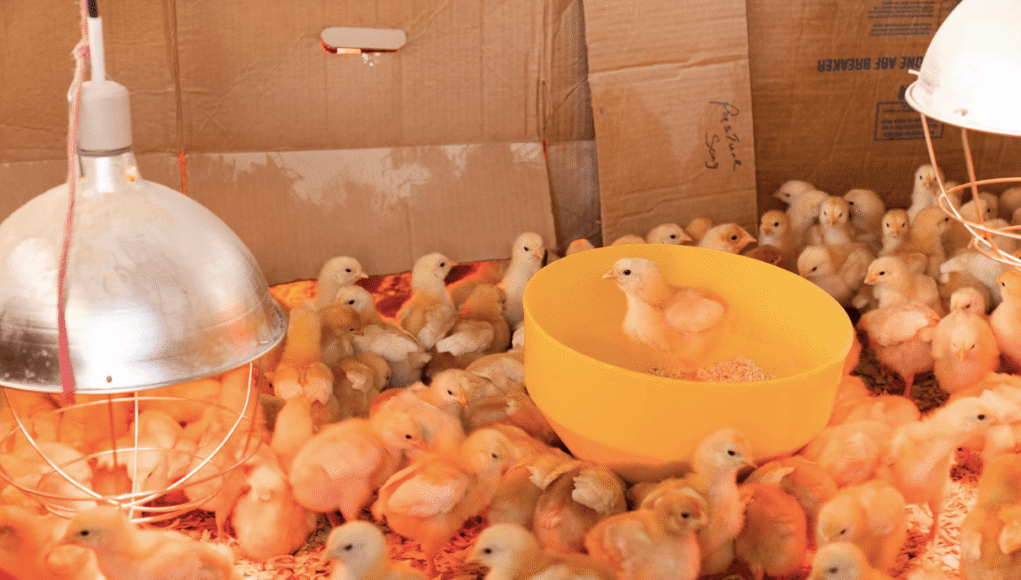
The brooder box is the primary housing for your chicks. It should be spacious enough to accommodate all your chicks comfortably. Cardboard brooder boxes are a popular choice for their affordability and ease of use.
2. Heat Source
Chicks need warmth to survive, especially in their first few weeks. A heat lamp or a brooder plate provides the necessary warmth. Ensure the heat source is adjustable to control the temperature as needed.
3. Bedding
Bedding is essential for comfort and cleanliness. Opt for materials like pine shavings, which are absorbent and easy to clean.
4. Food and Water
Provide easy access to food and water with suitable feeders and waterers. Ensure these are placed at a height accessible to the chicks.
Setting Up Your Portable Chick Brooder
Setting up a portable chick brooder involves several steps. For a detailed guide, consider visiting setup instructions.
Step 1: Choose the Location
Select a location that is draft-free and maintains a consistent temperature. This ensures the chicks remain warm and comfortable.
Step 2: Assemble the Brooder Box
Assemble your chosen brooder box, ensuring it’s secure and spacious enough for the chicks to move around.
Step 3: Install the Heat Source
Position the heat source at one end of the brooder, allowing chicks to move away if they get too warm.
Step 4: Add Bedding
Line the floor of the brooder box with a layer of bedding. Replace the bedding frequently to maintain cleanliness and prevent disease.
Step 5: Set Up Food and Water
Place the feeders and waterers in the brooder, ensuring they are stable and easily accessible to the chicks.
Maintaining the Brooder Environment
Ensure the brooder environment remains optimal by regularly checking the temperature and cleanliness. Adjust the heat source as needed and replace bedding frequently.
When to Move Chicks Out of the Brooder
Knowing when to move chicks out of the brooder is crucial. Typically, chicks are ready to transition when they are fully feathered and can regulate their body temperature independently.
Additional Tips for a Healthy Brooder
- Monitor chicks regularly for signs of illness.
- Ensure feeders and waterers are always clean.
- Provide a balanced diet suitable for chicks.
External Resources
For more detailed information on chick brooders, consider visiting The Chicken Chick.

FAQs
1. What is the ideal temperature for a brooder?
The ideal temperature starts at 95F for the first week, decreasing by 5F each week until fully feathered.
2. How often should I clean the brooder?
Clean the brooder at least once a week and change bedding as needed to keep it dry and clean.
3. Can I use a cardboard box as a brooder?
Yes, cardboard boxes can be used as a temporary brooder as long as they are kept dry and secure. For more ideas, check out this cardboard chick brooder.
This article contains affiliate links. We may earn a commission at no extra cost to you.


