Hatching bantam eggs in an incubator can be an exciting and rewarding experience. Whether you’re a seasoned poultry enthusiast or a beginner, understanding the process of incubating these tiny eggs is essential for success. In this guide, we’ll explore the ins and outs of how to hatch bantam eggs in an incubator, ensuring healthy chicks and a fulfilling experience.

Understanding Bantam Eggs
Bantam eggs are smaller than standard chicken eggs, and they require specific conditions for successful hatching. These miniature eggs are cherished for their unique characteristics and often sought after by hobbyists and farmers alike. To learn more about the characteristics of bantam eggs, check out this article for detailed insights.
Choosing the Right Incubator
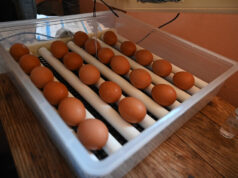
The first step in how to hatch bantam eggs in an incubator is selecting the right equipment. An incubator that allows you to control temperature, humidity, and ventilation is crucial. You can explore different types of incubators and their features in this humidity guide.
Size and Capacity
Consider the size and capacity of the incubator. Since bantam eggs are smaller, you can fit more eggs in a standard-sized incubator. However, ensure that there is sufficient space for air circulation.
Features to Look For
Look for features such as automatic egg turning, digital temperature control, and built-in humidity gauges. These will make the incubation process smoother and increase the chances of a successful hatch.
Preparing the Incubator
Before placing the eggs in the incubator, it’s essential to prepare it properly. This includes cleaning and disinfecting the unit, setting the right temperature and humidity levels, and ensuring proper ventilation.
Temperature Settings
The ideal temperature for incubating bantam eggs is between 99.5F and 100F. Maintaining a consistent temperature is crucial for embryo development. Learn more about incubation essentials.
Humidity Levels
Humidity is another critical factor in the incubation process. The recommended humidity level for bantam eggs is around 50-55% for the first 18 days, increasing to 65-70% during the final days before hatching.
Placing the Eggs
Once the incubator is ready, it’s time to place the eggs inside. Handle the eggs gently to avoid any cracks or damage.
Positioning the Eggs
Place the eggs with the pointed end facing down. This position allows for proper air cell development and helps the chick position itself for hatching.
Turning the Eggs
If your incubator doesn’t have an automatic turning feature, manually turn the eggs at least three times a day. This prevents the embryo from sticking to the shell and promotes healthy development.
Monitoring the Incubation Process
Regular monitoring is essential to ensure the incubator’s conditions remain optimal throughout the 21-day incubation period.
Candling the Eggs
Candling is a technique used to observe the development of the embryo inside the egg. It helps identify any non-viable eggs that should be removed. For more on candling, visit this candling guide.
Adjusting Conditions
Be prepared to make adjustments to temperature and humidity levels if necessary. Keeping a close eye on these factors increases the chances of a successful hatch.
The Hatching Process
As the 21-day incubation period comes to an end, the hatching process begins. This is an exciting time, but it’s essential to remain patient and avoid unnecessary interference.
Signs of Hatching
Chicks will start to pip, or break through the shell, usually around day 20. You’ll notice small cracks and hear faint chirping sounds as they make their way out.
Intervening in the Hatch
It’s tempting to assist struggling chicks, but it’s best to allow them to hatch on their own. Intervening can cause more harm than good and may increase the risk of deformities.
Caring for Newly Hatched Chicks
Once the chicks have successfully hatched, it’s time to move them to a brooder. Proper care in the early days is crucial for their health and development.
Setting Up a Brooder
A brooder is a warm, safe space for the chicks to grow. It should include a heat source, bedding, and access to food and water. For detailed brooder setup instructions, visit this chick care guide.
Feeding and Watering
Provide the chicks with a starter feed specifically formulated for their nutritional needs. Fresh water should be available at all times to ensure proper hydration.
Troubleshooting Common Issues
Even with careful preparation, challenges may arise during the incubation process. Understanding common issues can help you address them promptly.
Infertile Eggs
Infertile eggs won’t develop and should be removed during candling to prevent contamination.
Temperature Fluctuations
Temperature fluctuations can impact embryo development. Regularly check and adjust the incubator settings to maintain consistency.
Conclusion
Hatching bantam eggs in an incubator is a rewarding endeavor that requires careful planning and attention to detail. By following the steps outlined in this guide, you’ll increase your chances of a successful hatch and enjoy the experience of raising healthy chicks. For further reading, visit this external guide on egg incubation.

FAQ
What temperature should bantam eggs be incubated at?
Bantam eggs should be incubated at a consistent temperature of 99.5F to 100F.
How often should I turn bantam eggs in the incubator?
If not using an automatic turner, manually turn the eggs at least three times a day.
How long does it take for bantam eggs to hatch?
The incubation period for bantam eggs is typically 21 days, similar to standard chicken eggs.
This article contains affiliate links. We may earn a commission at no extra cost to you.


